Showing posts with label #realfood365. Show all posts

Tuesday, September 06, 2011

Chocolate Coconut "Larabars"


Chocolate Coconut "Larabars"
Put these items in a food processor and mix until they form a ball.  Set the ball aside in a bowl.

1 cup pitted dates, chopped
1 cup dried fruit (figs, raisins, etc.)*
1 1/2 tablespoons cocoa powder
pinch salt

Now put these items in the food processor and mix until the consistency is like coarse flour.  Add the ball back in by pinching pieces of it off and adding them into the food processor bowl.  Then add the coconut oil and water by drizzling over the bowl evenly.  Process until the dough becomes a ball again, or close to it.


1 1/3 cups soaked and dehydrated nuts (almonds, walnuts, cashews, hazelnuts, pecans, etc.)**
1/4 cup unsweetened shredded coconut
1/4 cocoa powder
2 tablespoons coconut oil (to desired consistency)
2 tablespoons filtered water (to desired consistency)


Press into a 8x8 glass pan, then cut into bars and serve immediately.  You can also store them in an airtight container at room temperature.

*I used dried figs

Saturday, September 03, 2011

Herbed Chicken Salad


Herbed Chicken Salad
3-4 cups of cooked chicken, cut up into cubes
1/2 cup mayonnaise (preferably homemade)
1/3 cup sour cream
two handfuls of parsley, finely chopped
handful of tarragon, finely chopped
handful of thyme, finely chopped
several sage leaves, finely chopped
2 pickles, finely chopped OR dill pickle relish
1 tsp dried dill
1 cup of grapes, sliced in half (optional)
1 cup of pecans and/or walnuts (preferably soaked and dehydrated) (optional)
salt and pepper to taste

1.  Combine all the ingredients in a large bowl and stir to combine.

Use to make sandwiches on sprouted bread, or if you are on GAPS, like me, eat wrapped up in a lettuce leaf.  Yum!

Wednesday, August 31, 2011

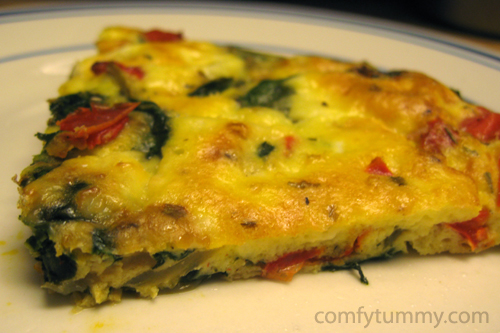
Onion, Pepper, Broccoli, and Herb Fritatta

photo credit: http://www.comfytummy.com/wp-content/uploads/2009/11/breakfast-pie-1.jpg


Onion, Pepper, Broccoli, and Herb Fritatta

Preheat oven to 400 degrees.  Chop all the vegetables and heat up a cast iron skillet to medium heat.  Grease a glass pie plate with butter or palm shortening or coconut oil and set aside.  Now saute these items together, until the onions are translucent, about 8 minutes.


2 tablespoons butter
1 onion, chopped
1 bell pepper, chopped
1/2 tsp dried thyme
1/2 tsp dried basil
salt and pepper to taste

Pour the cooked vegetables into the prepared pie plate.  Add all these items to the cast iron pan next, and saute until broccoli is bright green and tender, about 8 minutes.

2 tablespoons butter
1 cup chopped broccoli
1/2 tsp dried thyme
1/2 tsp dried basil
salt and pepper to taste

Pour this batch of cooked vegetables into the prepared pie plate as well.  Spread around evenly.  Then combine these items in a separate bowl:

8 eggs, whisked
1 cup shredded cheddar
salt and pepper to taste

And pour the egg mixture over the vegetables in the pie plate, making sure they are all covered and with egg (for the most part).

Add more salt, pepper, thyme and basil to taste on top.  Bake at 400 degrees for 20-25 minutes.

Tuesday, August 30, 2011

How Do I Start GAPS?

I've had a lot of people ask me about how to get started on GAPS now that I have been at it myself for 5 1/2 months. Whoa! That's a long time! Anyways, I wrote an email to my friend, and it turned into this post. Hopefully you will find the links and structure inspiring so that you might take GAPS on for yourself.

GAPS Introduction and How-To
Let's start at the very beginning, a very good place to staaart! Okay, so first of all here's the basic overview of the diet: GAPS Diet Overview. Now you know where you're going, and it's time to prepare prior to starting Intro Diet:

  • buy GAPS books:
    • do NOT buy Gut and Psychology Syndrome unless you can afford it no problem and you would like to read it; it's not essential, it's haphazardly written, but it's also very interesting in a rambling kind of way!
    • DO buy GAPS Guide by Baden Lashkov, which is much more clearly written, shorter and cheaper :)
    • DO buy Internal Bliss, which is a spiral-bound book full of GAPS recipes
    • you can buy any or all of these books here more easily (and cheaper!) than on Amazon (which I linked to for review purposes, not price/ease): List of GAPS Books
  • buy cod liver oil: Green Pastures Cod Liver Oil
  • buy probiotics:
    • Bio-Kult is recommended and it really IS awesome; you can buy it here: Bio-Kult Probiotics
      • I would recommend buying in bulk since it goes from $42/bottle to $37/bottle.
    • The next best probiotic I have found is the Garden of Life Vitamin Code Raw Probiotics (it says 85 billion live cultures on the bottle), and it's a little cheaper: Garden of Life RAW Probiotics - Women
  • find bones/meat using this link: Eat Wild Directory or this link: Grassfed Beef Directory
    • find grass-fed beef, lamb (if stuck, Whole Foods has them, but they are pricey)
    • find pastured chickens (Whole Foods has a decent price on pastured chickens: the Mary's Air Chilled Pastured chickens; buy in a "box" and they will give you 10% off)
    • find wild seafood (this is easy to find, but harder to find with bones; try Asian markets)
  • make bone broth ahead of time, store in freezer (make sure to store in large glass jars or safe plastic like polypropylene)
  • buy/make sauerkraut, pickles, other fermented veggies
  • find good local eggs: How To Buy Eggs
    • ask if their chickens eat soy, you do NOT want soy in the feed
    • ask if their chickens eat bugs outside in the sun, since this produces dark yolks full of vitamin D and other nutrients
    • you may pay $5/dozen at farmer's markets, but people with backyard chickens tend to charge around $3/dozen, so keep your ears open for those opportunities
  • find raw dairy: Where To Get Real Milk
    • how to make raw milk yogurt:
      • buy some store whole milk organic yogurt and put 1-2 tablespoons in a quart mason jar and fill with raw milk, stir, cover with a cloth, and let sit at room temperature (around 85 degrees) for at least 24 hours; then you have yogurt!
      • OR you can make your own starter and then make raw milk yogurt from that; here's a how-to: GAPS Yogurt OR Homemade Yogurt
      • OR you can simply buy and use Strauss, Humboldt or Trader Joe's yogurts; make sure they are whole milk, organic, plain, and have a long list of different strains of bacteria in them (the longer the list the better!)
    • how to make sour cream:
      • recipe:
      • OR buy Daisy brand or any other sour cream that has only the ingredients: cream, milk, culture, salt (no skim milk, no milk powder, no thickeners)
    • how to make whey (from raw milk, yogurt, etc.): How To Make Whey
    • how to make ghee: How To Make Ghee
      • use Kerrygold or Humboldt butter (they are grass-fed), or other grass-fed butters you might find in your area
    • find raw cheese:
      • there are raw, grass-fed cheeses on Azure Standard
      • Rumiano is a grass-fed brand
      • Tillamook is grass-fed MOST of the time if you are in a bind (it's also not raw)
      • Organic Valley is raw, but I don't know if they are grass-fed
      • Trader Joe's carries some grass-fed cheeses
  • soak and dehydrate nuts for later in Intro Diet
    • How to soak: Soaking Nuts
    • then dehydrate out in the sun or in a dehydrator until crisp again
    • to use as "flour" just grind up in a food processor
  • find coconut flour, coconut oil, coconut shreds (unsweetened): all available at Azure Standard
    • virgin coconut oil tastes and smells like coconut, whereas the expeller-pressed kind has no flavor or taste
    • coconut flour is VERY handy for making treats, but has a lot of fiber so eat carefully
    • coconut shreds are tasty and filling, plus you can add them to yogurt bowls and things like that
  • make water kefir, milk kefir, or kombucha (all are allowed):
Okay, now you're ready to start.  You should have a fridge/freezer full of stock, yogurt, sauerkraut, whey, eggs, veggies, grass-fed meats, ghee and such (eventually in stage 6 of Intro Diet you can add nuts and fruit)
Below is a Google doc with all my recipes in it, both for Intro Diet and Full GAPS Diet.  It's a work in progress because I haven't transferred all the recipes over, plus I'm always finding new ones.  Feel free to check it out, and add more links in comments if you have them!
Also, I have two additional Google docs that go into more depth with real food and candida, both of which are very helpful:
I hope this helps (and doesn't overwhelm!) you as you get started.  I'm so excited to help you transition into this!

Monday, August 22, 2011

Peanut Butter Brownies with Chocolate Buttercream Frosting (GAPS, grain-free)

I saw this recipe on Grain-Free Foodies and was inspired to make a chocolate-peanut butter version for my GAPS dessert quota.  They came out so beautifully!  I would even make these for company, kind of like the Lemon Curd Bars that even "regular" people like.  I tend to worry about my taste buds these days, since having been on GAPS and real food for so long I don't need as much sweetener in my desserts.  But really, these brownies are good enough for anyone to like, even if they aren't a fellow GAPSter.

Chocolate-Frosted Peanut Butter Brownies
2 1/2 cups peanut butter
1 cup raw honey
4 eggs
3/4 tsp. baking soda--optional, do not use if on GAPS

1. Preheat oven to 325 degrees.  Combine all ingredients together with a stand mixer using the paddle attachment, until the batter is well-mixed, glossy and slightly stiff.  However, do not beat too long!  If it's too stiff, then the brownies will be tough.
2.  Butter a 10x15 glass pyrex pan very generously.  Pour batter into the pan, spreading out with a spatula.  If this doesn't work, get your fingers wet with water and press into an even layer.
3.  Bake for 30-35 minutes, until golden brown and set in the middle.
4.  Let cool completely before frosting.

Chocolate Buttercream Frosting
2 sticks grass-fed butter, at room temperature
1/2 cup raw honey
2/3 cup cocoa powder
2 tsp. vanilla

1.  Put butter and honey into a bowl on your stand mixer fitted with the whisk attachment.  Whisk at a high speed for 3-5 minutes until well-combined and light colored.  Turn mixer off and add cocoa powder and vanilla.  Start mixer slow until combined, then whisk on high for another 3-5 minutes.  Turn off, scrape down the sides of the bowl and combine by hand.  
2.  Chill entire bowl and whisk attachment in the fridge for 30 minutes.  Remove and whisk once more for 3-5 minutes.  Use to frost immediately.  Store leftover frosting in the fridge.

Thursday, August 04, 2011

GAPS Chocolate Nut Bars and Coconut Lemon Bars

Oh boy are these good!  I based them off the wrapper of the Chocolate Coconut Chew Larabar I ate earlier yesterday, using this recipe as a template from Wardeh over at GNOWFGLINS.  I made a double batch and pressed them into a 9x13 pan and they fit perfectly.

These bars are great because they are high in protein, the only sugars are from the dried fruit, and they are made with organic items.   The nuts called for have been soaked in salty water and dehydrated to reduce enzyme inhibitors.  This is also a raw and GAPS friendly recipe, not to mention portable and relatively easy to make in bulk.  I haven't priced it out, but I am also pretty sure that my homemade bars are cheaper than the individual price of a Larabar at $1.29 at Trader Joe's and $1.49 at Whole Foods.  But that's not to say that they aren't worth it, because I am known to buy a box of 12 bars at Whole Foods upon occasion!

Chocolate Nut Bars
1 cup pitted dates
1/2 cup dried figs
1/2 cup raisins
3 T cocoa powder
large pinch of coarse sea salt

3/4 cup soaked and dehydrated almonds
3/4 cup soaked and dehydrated walnuts
scant 1/4 cup cocoa powder
scant 1/4 cup shredded coconut

approx. 2 T. expeller-pressed coconut oil
approx. 2 T. filtered water

1.  Put dates, figs, raisins, 3 T cocoa powder and salt into a food processor and process until it turns into a paste and forms a ball.  It should take a few minutes, and may require you to hold your food processor down firmly for the first minute or so!
2.  Remove ball of paste and set aside in a bowl.  Add almonds and walnuts to the food processor and process until a fine nut meal forms (don't go too long or you will have almond-walnut butter).  
3.  Turn off and add the ball of fruit paste back in, pinching into smaller pieces to ease the mixing process.  Add remaining cocoa powder and coconut and process until 


it makes a dry paste that you can press into a glass pan.  If needed, add a little coconut oil and water to moisten, about 1/2 teaspoon at a time.


Coconut Lemon Bars
1 cup dates
1/2 cup dried figs
1/2 cup raisins
2 T. shredded coconut
large pinch of sea salt

3/4 cup soaked and dehydrated almonds
3/4 cup soaked and dehydrated walnuts
scant 1/2 cup cocoa powder
juice of 3 lemons

approx. 2 T. expeller-pressed coconut oil
approx. 2 T. filtered water


1.  Put dates, figs, raisins, 3 T. shredded coconut and salt into a food processor and process until it turns into a paste and forms a ball.  It should take a few minutes, and may require you to hold your food processor down firmly for the first minute or so!


2.  Remove ball of paste and set aside in a bowl.  Add almonds and walnuts to the food processor and process until a fine nut meal forms (don't go too long or you will have almond-walnut butter).  
3.  Turn off and add the ball of fruit paste back in, pinching into smaller pieces to ease the mixing process.  Add remaining shredded coconut and lemon juice and process until it makes a dry paste that you can press into a glass pan.  If needed, add a little coconut oil and water to moisten, about 1/2 teaspoon at a time.

Tuesday, July 26, 2011

Chocolate Buttercream Frosting (w/ Chocolate Mint and Chocolate Orange options)

Basic Chocolate Buttercream
1 cup softened grass-fed butter
1/2 cup raw honey
1/2 cup cocoa powder
2 tsp. vanilla

Mint Chocolate Variation:
add 1 tsp. mint extract


Orange Chocolate Variation:
add 1 tsp. orange extract

Monday, July 04, 2011

Bone Broth Challenge (not so hard when you're on GAPS)

CHEESESLAVE is doing a Bone Broth Challenge for the month of July.  Since I am about halfway through my third month on GAPS, I decided to join in and raise awareness on bone broth and all it's benefits.

First things first, how do you make bone broth?  Well, I use the Broth is Beautiful recipe here.  You will find recipes for basic chicken, beef, and fish stock there.  Or I make my delicious basic Homemade Chicken Soup, without dumplings for now while I complete GAPS.

Lately I have been just throwing bones, water, carrots, celery, and a little apple cider vinegar into my slow cooker for one hour at room temperature (the vinegar draws the minerals out of the bones).  Then I move the slow cooker outside on a chair and cook it on high overnight.  That's the easiest way to make stock I have found.

I have had some truly amazing healing take place for me as I have drunk three cups of broth every day for the last 3.5 months.  You don't need to commit to GAPS or cups of stock every day to feel better though.  If you do the Bone Broth Challenge, you are only committing to one cup every day.  See how you feel after this month.

Benefits of bone broths include:

  1. Healing your gut lining: stock is alkalizing, which balances and soothes leaky gut syndrome (which most of us have from growing up eating the Standard American Diet (SAD)).
  2. Collagen: this can help reverse wrinkles and cellulite.  For me this is a possible added bonus while I do GAPS!
  3. Calcium and other minerals: this can revitalize your teeth and bones, hair and fingernails.  I have even heard some people swear they have remineralized teeth that have been hit by decay.

Friday, April 01, 2011

Things M Says (part 38)

critiquing me, like a judge on Top Chef


M: "This is a really nice smoothie, probably the best one you've made so far.  It's got a good flavor from the kefir and berries, and it's really cold.  Overall, very delicious Mom."
me: "Um, thanks."

Monday, March 07, 2011

Parmesan-Crusted Grilled Cheese Sammies

We all know how to make a basic grilled cheese sandwich, bread plus cheese plus butter grilled in a pan.  But wow are these fancified grilled sammies yummy!  Hat tip to my sister, who makes the best crispy parmesan creations ever :)

Parmesan-Crusted Grilled Cheese Sammies
from T-Nee, my sister

2 slices of sprouted whole grain bread, like at Trader Joe's (they have several kinds--I buy the organic kind with no soy on the ingredient list)
slices of raw cheddar cheese
grass-fed butter, like Kerrygold
parmesan cheese, grated with a microplane
garlic powder
dried oregano
dried basil

1. Heat an empty cast iron skillet on medium heat while you get your sandwich ready.
2. Butter a thick layer on to each piece of bread (remember that you need the fats to digest the grains!).  Sprinkle with parmesan and press to make it stick well.  Sprinkle with a little garlic powder, oregano and basil.  Then build the sandwich carefully in the pan with the cheddar in the middle.  
3. Lower the heat to low, and cover pan with a lid.  Grill until the parmesan is browned and crispy, and the cheddar is melting.  Then flip and grill the other side to match.  Serve with tomato soup, or in my case tonight: roasted red-pepper and tomato soup from, you guessed it, Trader Joe's!

Wednesday, February 02, 2011

Almond Roca (sugar-free, honey-sweetened)

Ever since the holidays we have been enjoying little bites of almond roca for an occasional sweet treat.  This candy is very easy to make.  Simple directions and a short list of ingredients make for an elegant dessert with a crunch.  I make it plain, but you can melt chocolate and drizzle it on top for a more decadent version.

When I use them, I soak raw nuts and seeds in a salty brine for a day, then dehydrate them a low temperature to improve digestibility.  The soaking removes enzyme inhibitors, which interfere with your body's ability to utilize the enzymes present in these raw morsels.  Then the dehydrating returns them to their crispy state, but doesn't kill the enzymes that are now available for absorption in the body.  It is still better to soak nuts and seeds even if you plan to roast them.  The enzymes will die, but at least the enzyme inhibitors are neutralized.

Almond Roca

1 1/2 cups butter
1 cup honey
1 cup chopped almonds

1. Melt butter gently in a saucepan.  Add honey while the butter melts, stirring constantly until nicely combined.  

2. Using a candy thermometer, heat the mixture over medium-high heat until it reaches the "soft-crack stage" or the "hard-crack stage".  Use "soft-crack" for a softer candy that bends, but then cracks into pieces when broken apart.  Use "hard-crack" for a harder candy that is stiff, and doesn't bend when broken into pieces.
3. After the mixture reaches the desired temperature, stir in the chopped almonds until combined.  Then immediately spread onto a jelly roll pan lined with parchment paper, or that has been buttered to cool.  Let cool for 45 minutes or so.  Transfer to the refrigerator to cool completely.
 4.  When you put your hand on the candy and cannot feel any more heat radiating from it, remove from the refrigerator to break into pieces.  Remove the pan and paper.  Break into any size you like.

5.  You can store the candy at room temperature, but it does get a bit sticky and the pieces hold on to each other.  I kept ours in the fridge until they were mostly gone, then started keeping the remainder in the cupboard.  Either way I prefer to eat them at room temperature, so if you store in the refrigerator, remove about 20 minutes before you want to eat it.

This post is part of Real Food Wednesdays at Kelly the Kitchen Kop.

Wednesday, January 19, 2011

(Quick) Tomato Basil Soup with Parmesan Curls

I love tomato soup. Of course, I grew up getting mine out of a can. Canned soup generally contains monosodium glutamate (MSG), vegetable oils like cottonseed, soybean, canola, safflower or sunflower (which are usually cheap, rancid byproducts of Big Ag), high fructose corn syrup, citric acid (another kind of MSG), autolyzed yeast (yet another kind of MSG), cheap iodized salt, wheat flour (which is white flour, probably "enriched" which really means "devoid of nutritional value"). But now that I know about the ingredients in canned soup, I am happy to make my own.  Since I am in the habit of making my own stocks, I can usually throw a soup together in a few minutes.

I usually follow a basic Tomato Cream Soup recipe from Kim Knoch at The Nourishing Cook. She says you can throw it all together in 3 minutes, and she's right.  I usually double her recipe since I have the large cans of diced tomatoes.

I DO use canned tomatoes, which are not ideal due to BPA in the linings of most canned foods.  Eden Organic is the only canned food manufacturer in the States using BPA-free cans, but even they are unable to use those BPA-free cans for tomatoes.  The FDA won't allow it, due to their acidity.

But until I learn how to can, and how to find the time to do it, I am calling compromise on this one.  Maybe once tomatoes are in season here, I will dice them up for fresh tomato soup.

Tomato Cream Soup
28 ounce can of diced tomatoes, or tomato sauce
1/2 cup tomato paste
1 cup cream
1 cup whole milk
sea salt and pepper to taste

1. Add all ingredients to a soup pot, blending with a stick blender to desired consistency (if you used diced tomatoes).  Heat through and serve.

After I had made this basic recipe a few times, which is perfect for a cold day or for dipping grilled ham and cheese sandwiches, I wanted to make something a little different.

Tomato Basil Cream Soup with Parmesan Curls
14 ounce can of diced tomatoes
14 ounce can tomato sauce
1/2 cup tomato paste
1 cup cream
1 cup whole milk
sea salt and pepper to taste
1 tablespoon garlic powder
1 tablespoon onion powder
2-3 tablespoons dried basil (or a handful of chopped fresh basil)
parmesan cheese curls, cut with a knife or cheese slicer

1. Combine all ingredients except cheese curls into a large soup pot.  Heat through, blending with a stick blender to your desired consistency.  Serve in bowls with cheese curls floating on top, and with sourdough toasts and grass-fed butter or homemade crackers.

(This post is part of Real Food Wednesdays at Kelly the Kitchen Kop)

Friday, January 14, 2011

Real Food Nutrition and Health E-Course

RFNHecoursepic.jpg


Food Renegade is one of my oft-checked real food blogs.  I am getting more involved with Real Food Media and blogging here at k-land about real food, nourishing practices, and my family's health.  As I build up momentum, I am inspired by the work some of these bloggers do.  It's not just the beautiful websites and the wholesome recipes, it's the feeling of solidarity to have people with me in the real food arena.  A lot of people doubt the veracity of Nourishing Tradition's claims, or that saturated fat really is good for you, or that our ancestors ate raw dairy, sprouted and sourdoughed grains, pastured meats and eggs.

Starting on February 4th and ending April 8th, Food Renegade's Kristen is starting an e-class, complete with e-book!, that teaches you all the basics to traditional foods.  I love how Kristen puts it:

"Nutrition fascinates me. It's a blend of biology, history, chemistry. It's the story of traditional peoples and what they ate, the story of convenience foods and food manufacturing. It's the story of modern Industrial agriculture, synthetic fertilizers and pesticides, genetic engineering, and diminishing top soil while also being the story of humane animal husbandry, biodynamic farming, and a respect for life. It's the story of modern diseases like cancer, diabetes, and heart disease. Yet it also teaches about true health and aging with stamina."

I feel the exact same way.  I love the intersection of learning about my ancestors and what they ate, wading through current science on nutrition, and then actually incorporating those practices into my kitchen and family menu.  I already have downloaded the ebook, and I am looking forward to the course coming up in a few weeks!

Real Food Nutrition and Health E-Course


And here is a short video to introduce you to what the e-course is all about.  It sounds a lot like Kristen has managed to cover all the basics.  This is great way to jump in to real, whole, traditional food.  Or if you already have committed, it can sharpen your understand of why we all need real food so much.  Enjoy!


Monday, January 03, 2011

Real Food Resolutions

It's that time of year where almost everyone makes a new year's resolution, and I am no different.  I just wrote a post this morning about meditation and cleaning, two paths that I am endeavoring to take this year on 2011.

In the meantime, I have noticed that one of my favorite bloggers, Kimi over at The Nourishing Gourmet, is hosting a Nourishing Resolutions 2011 carnival today.  So here I am, making my real food resolution list.

Real Food Resolutions:

  1. For vitamin K2: Make liver once a week, or serve natto. (Either way we will be having hard cheese and Kerrygold butter almost daily.)
  2. For B vitamins: Make a Coconut Smoothie with nutritional yeast added to it at least once a week.  
  3. For maintenance: Keep going and maintaining my current nourishing practices by making water kefir, making beet kvass, sprouting wheat for flour, soaking grains, soaking and dehydrating nuts, taking daily cod liver oil and butter oil, daily vitamin C and B complex, maca root, oregano oil, iodine from kelp, and a multivitamin.
  4. Participate: Join in a real food carnival once a month.
  5. Continue with my weight loss goal: Operation Lose Baby Weight.  (Based on Eat Fat, Lose Fat.)