Showing posts with label GAPS. Show all posts

Tuesday, September 06, 2011

Chocolate Coconut "Larabars"


Chocolate Coconut "Larabars"
Put these items in a food processor and mix until they form a ball.  Set the ball aside in a bowl.

1 cup pitted dates, chopped
1 cup dried fruit (figs, raisins, etc.)*
1 1/2 tablespoons cocoa powder
pinch salt

Now put these items in the food processor and mix until the consistency is like coarse flour.  Add the ball back in by pinching pieces of it off and adding them into the food processor bowl.  Then add the coconut oil and water by drizzling over the bowl evenly.  Process until the dough becomes a ball again, or close to it.


1 1/3 cups soaked and dehydrated nuts (almonds, walnuts, cashews, hazelnuts, pecans, etc.)**
1/4 cup unsweetened shredded coconut
1/4 cocoa powder
2 tablespoons coconut oil (to desired consistency)
2 tablespoons filtered water (to desired consistency)


Press into a 8x8 glass pan, then cut into bars and serve immediately.  You can also store them in an airtight container at room temperature.

*I used dried figs

Wednesday, August 31, 2011

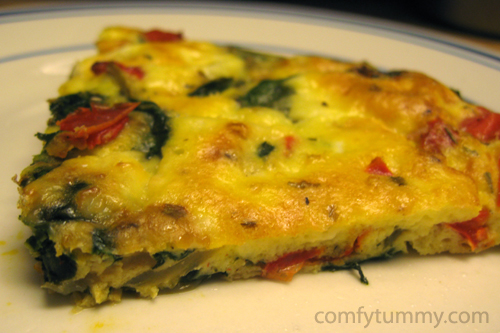
Onion, Pepper, Broccoli, and Herb Fritatta

photo credit: http://www.comfytummy.com/wp-content/uploads/2009/11/breakfast-pie-1.jpg


Onion, Pepper, Broccoli, and Herb Fritatta

Preheat oven to 400 degrees.  Chop all the vegetables and heat up a cast iron skillet to medium heat.  Grease a glass pie plate with butter or palm shortening or coconut oil and set aside.  Now saute these items together, until the onions are translucent, about 8 minutes.


2 tablespoons butter
1 onion, chopped
1 bell pepper, chopped
1/2 tsp dried thyme
1/2 tsp dried basil
salt and pepper to taste

Pour the cooked vegetables into the prepared pie plate.  Add all these items to the cast iron pan next, and saute until broccoli is bright green and tender, about 8 minutes.

2 tablespoons butter
1 cup chopped broccoli
1/2 tsp dried thyme
1/2 tsp dried basil
salt and pepper to taste

Pour this batch of cooked vegetables into the prepared pie plate as well.  Spread around evenly.  Then combine these items in a separate bowl:

8 eggs, whisked
1 cup shredded cheddar
salt and pepper to taste

And pour the egg mixture over the vegetables in the pie plate, making sure they are all covered and with egg (for the most part).

Add more salt, pepper, thyme and basil to taste on top.  Bake at 400 degrees for 20-25 minutes.

Tuesday, August 30, 2011

How Do I Start GAPS?

I've had a lot of people ask me about how to get started on GAPS now that I have been at it myself for 5 1/2 months. Whoa! That's a long time! Anyways, I wrote an email to my friend, and it turned into this post. Hopefully you will find the links and structure inspiring so that you might take GAPS on for yourself.

GAPS Introduction and How-To
Let's start at the very beginning, a very good place to staaart! Okay, so first of all here's the basic overview of the diet: GAPS Diet Overview. Now you know where you're going, and it's time to prepare prior to starting Intro Diet:

  • buy GAPS books:
    • do NOT buy Gut and Psychology Syndrome unless you can afford it no problem and you would like to read it; it's not essential, it's haphazardly written, but it's also very interesting in a rambling kind of way!
    • DO buy GAPS Guide by Baden Lashkov, which is much more clearly written, shorter and cheaper :)
    • DO buy Internal Bliss, which is a spiral-bound book full of GAPS recipes
    • you can buy any or all of these books here more easily (and cheaper!) than on Amazon (which I linked to for review purposes, not price/ease): List of GAPS Books
  • buy cod liver oil: Green Pastures Cod Liver Oil
  • buy probiotics:
    • Bio-Kult is recommended and it really IS awesome; you can buy it here: Bio-Kult Probiotics
      • I would recommend buying in bulk since it goes from $42/bottle to $37/bottle.
    • The next best probiotic I have found is the Garden of Life Vitamin Code Raw Probiotics (it says 85 billion live cultures on the bottle), and it's a little cheaper: Garden of Life RAW Probiotics - Women
  • find bones/meat using this link: Eat Wild Directory or this link: Grassfed Beef Directory
    • find grass-fed beef, lamb (if stuck, Whole Foods has them, but they are pricey)
    • find pastured chickens (Whole Foods has a decent price on pastured chickens: the Mary's Air Chilled Pastured chickens; buy in a "box" and they will give you 10% off)
    • find wild seafood (this is easy to find, but harder to find with bones; try Asian markets)
  • make bone broth ahead of time, store in freezer (make sure to store in large glass jars or safe plastic like polypropylene)
  • buy/make sauerkraut, pickles, other fermented veggies
  • find good local eggs: How To Buy Eggs
    • ask if their chickens eat soy, you do NOT want soy in the feed
    • ask if their chickens eat bugs outside in the sun, since this produces dark yolks full of vitamin D and other nutrients
    • you may pay $5/dozen at farmer's markets, but people with backyard chickens tend to charge around $3/dozen, so keep your ears open for those opportunities
  • find raw dairy: Where To Get Real Milk
    • how to make raw milk yogurt:
      • buy some store whole milk organic yogurt and put 1-2 tablespoons in a quart mason jar and fill with raw milk, stir, cover with a cloth, and let sit at room temperature (around 85 degrees) for at least 24 hours; then you have yogurt!
      • OR you can make your own starter and then make raw milk yogurt from that; here's a how-to: GAPS Yogurt OR Homemade Yogurt
      • OR you can simply buy and use Strauss, Humboldt or Trader Joe's yogurts; make sure they are whole milk, organic, plain, and have a long list of different strains of bacteria in them (the longer the list the better!)
    • how to make sour cream:
      • recipe:
      • OR buy Daisy brand or any other sour cream that has only the ingredients: cream, milk, culture, salt (no skim milk, no milk powder, no thickeners)
    • how to make whey (from raw milk, yogurt, etc.): How To Make Whey
    • how to make ghee: How To Make Ghee
      • use Kerrygold or Humboldt butter (they are grass-fed), or other grass-fed butters you might find in your area
    • find raw cheese:
      • there are raw, grass-fed cheeses on Azure Standard
      • Rumiano is a grass-fed brand
      • Tillamook is grass-fed MOST of the time if you are in a bind (it's also not raw)
      • Organic Valley is raw, but I don't know if they are grass-fed
      • Trader Joe's carries some grass-fed cheeses
  • soak and dehydrate nuts for later in Intro Diet
    • How to soak: Soaking Nuts
    • then dehydrate out in the sun or in a dehydrator until crisp again
    • to use as "flour" just grind up in a food processor
  • find coconut flour, coconut oil, coconut shreds (unsweetened): all available at Azure Standard
    • virgin coconut oil tastes and smells like coconut, whereas the expeller-pressed kind has no flavor or taste
    • coconut flour is VERY handy for making treats, but has a lot of fiber so eat carefully
    • coconut shreds are tasty and filling, plus you can add them to yogurt bowls and things like that
  • make water kefir, milk kefir, or kombucha (all are allowed):
Okay, now you're ready to start.  You should have a fridge/freezer full of stock, yogurt, sauerkraut, whey, eggs, veggies, grass-fed meats, ghee and such (eventually in stage 6 of Intro Diet you can add nuts and fruit)
Below is a Google doc with all my recipes in it, both for Intro Diet and Full GAPS Diet.  It's a work in progress because I haven't transferred all the recipes over, plus I'm always finding new ones.  Feel free to check it out, and add more links in comments if you have them!
Also, I have two additional Google docs that go into more depth with real food and candida, both of which are very helpful:
I hope this helps (and doesn't overwhelm!) you as you get started.  I'm so excited to help you transition into this!

Monday, August 22, 2011

Peanut Butter Brownies with Chocolate Buttercream Frosting (GAPS, grain-free)

I saw this recipe on Grain-Free Foodies and was inspired to make a chocolate-peanut butter version for my GAPS dessert quota.  They came out so beautifully!  I would even make these for company, kind of like the Lemon Curd Bars that even "regular" people like.  I tend to worry about my taste buds these days, since having been on GAPS and real food for so long I don't need as much sweetener in my desserts.  But really, these brownies are good enough for anyone to like, even if they aren't a fellow GAPSter.

Chocolate-Frosted Peanut Butter Brownies
2 1/2 cups peanut butter
1 cup raw honey
4 eggs
3/4 tsp. baking soda--optional, do not use if on GAPS

1. Preheat oven to 325 degrees.  Combine all ingredients together with a stand mixer using the paddle attachment, until the batter is well-mixed, glossy and slightly stiff.  However, do not beat too long!  If it's too stiff, then the brownies will be tough.
2.  Butter a 10x15 glass pyrex pan very generously.  Pour batter into the pan, spreading out with a spatula.  If this doesn't work, get your fingers wet with water and press into an even layer.
3.  Bake for 30-35 minutes, until golden brown and set in the middle.
4.  Let cool completely before frosting.

Chocolate Buttercream Frosting
2 sticks grass-fed butter, at room temperature
1/2 cup raw honey
2/3 cup cocoa powder
2 tsp. vanilla

1.  Put butter and honey into a bowl on your stand mixer fitted with the whisk attachment.  Whisk at a high speed for 3-5 minutes until well-combined and light colored.  Turn mixer off and add cocoa powder and vanilla.  Start mixer slow until combined, then whisk on high for another 3-5 minutes.  Turn off, scrape down the sides of the bowl and combine by hand.  
2.  Chill entire bowl and whisk attachment in the fridge for 30 minutes.  Remove and whisk once more for 3-5 minutes.  Use to frost immediately.  Store leftover frosting in the fridge.

Thursday, August 04, 2011

GAPS Chocolate Nut Bars and Coconut Lemon Bars

Oh boy are these good!  I based them off the wrapper of the Chocolate Coconut Chew Larabar I ate earlier yesterday, using this recipe as a template from Wardeh over at GNOWFGLINS.  I made a double batch and pressed them into a 9x13 pan and they fit perfectly.

These bars are great because they are high in protein, the only sugars are from the dried fruit, and they are made with organic items.   The nuts called for have been soaked in salty water and dehydrated to reduce enzyme inhibitors.  This is also a raw and GAPS friendly recipe, not to mention portable and relatively easy to make in bulk.  I haven't priced it out, but I am also pretty sure that my homemade bars are cheaper than the individual price of a Larabar at $1.29 at Trader Joe's and $1.49 at Whole Foods.  But that's not to say that they aren't worth it, because I am known to buy a box of 12 bars at Whole Foods upon occasion!

Chocolate Nut Bars
1 cup pitted dates
1/2 cup dried figs
1/2 cup raisins
3 T cocoa powder
large pinch of coarse sea salt

3/4 cup soaked and dehydrated almonds
3/4 cup soaked and dehydrated walnuts
scant 1/4 cup cocoa powder
scant 1/4 cup shredded coconut

approx. 2 T. expeller-pressed coconut oil
approx. 2 T. filtered water

1.  Put dates, figs, raisins, 3 T cocoa powder and salt into a food processor and process until it turns into a paste and forms a ball.  It should take a few minutes, and may require you to hold your food processor down firmly for the first minute or so!
2.  Remove ball of paste and set aside in a bowl.  Add almonds and walnuts to the food processor and process until a fine nut meal forms (don't go too long or you will have almond-walnut butter).  
3.  Turn off and add the ball of fruit paste back in, pinching into smaller pieces to ease the mixing process.  Add remaining cocoa powder and coconut and process until 


it makes a dry paste that you can press into a glass pan.  If needed, add a little coconut oil and water to moisten, about 1/2 teaspoon at a time.


Coconut Lemon Bars
1 cup dates
1/2 cup dried figs
1/2 cup raisins
2 T. shredded coconut
large pinch of sea salt

3/4 cup soaked and dehydrated almonds
3/4 cup soaked and dehydrated walnuts
scant 1/2 cup cocoa powder
juice of 3 lemons

approx. 2 T. expeller-pressed coconut oil
approx. 2 T. filtered water


1.  Put dates, figs, raisins, 3 T. shredded coconut and salt into a food processor and process until it turns into a paste and forms a ball.  It should take a few minutes, and may require you to hold your food processor down firmly for the first minute or so!


2.  Remove ball of paste and set aside in a bowl.  Add almonds and walnuts to the food processor and process until a fine nut meal forms (don't go too long or you will have almond-walnut butter).  
3.  Turn off and add the ball of fruit paste back in, pinching into smaller pieces to ease the mixing process.  Add remaining shredded coconut and lemon juice and process until it makes a dry paste that you can press into a glass pan.  If needed, add a little coconut oil and water to moisten, about 1/2 teaspoon at a time.

Tuesday, July 26, 2011

Chocolate Buttercream Frosting (w/ Chocolate Mint and Chocolate Orange options)

Basic Chocolate Buttercream
1 cup softened grass-fed butter
1/2 cup raw honey
1/2 cup cocoa powder
2 tsp. vanilla

Mint Chocolate Variation:
add 1 tsp. mint extract


Orange Chocolate Variation:
add 1 tsp. orange extract

Monday, July 04, 2011

Bone Broth Challenge (not so hard when you're on GAPS)

CHEESESLAVE is doing a Bone Broth Challenge for the month of July.  Since I am about halfway through my third month on GAPS, I decided to join in and raise awareness on bone broth and all it's benefits.

First things first, how do you make bone broth?  Well, I use the Broth is Beautiful recipe here.  You will find recipes for basic chicken, beef, and fish stock there.  Or I make my delicious basic Homemade Chicken Soup, without dumplings for now while I complete GAPS.

Lately I have been just throwing bones, water, carrots, celery, and a little apple cider vinegar into my slow cooker for one hour at room temperature (the vinegar draws the minerals out of the bones).  Then I move the slow cooker outside on a chair and cook it on high overnight.  That's the easiest way to make stock I have found.

I have had some truly amazing healing take place for me as I have drunk three cups of broth every day for the last 3.5 months.  You don't need to commit to GAPS or cups of stock every day to feel better though.  If you do the Bone Broth Challenge, you are only committing to one cup every day.  See how you feel after this month.

Benefits of bone broths include:

  1. Healing your gut lining: stock is alkalizing, which balances and soothes leaky gut syndrome (which most of us have from growing up eating the Standard American Diet (SAD)).
  2. Collagen: this can help reverse wrinkles and cellulite.  For me this is a possible added bonus while I do GAPS!
  3. Calcium and other minerals: this can revitalize your teeth and bones, hair and fingernails.  I have even heard some people swear they have remineralized teeth that have been hit by decay.

Sunday, May 08, 2011

From Eat Fat, Lose Fat to GAPS Intro Diet


As you all know, I committed to lose weight using the Eat Fat, Lose Fat regimen last October.  What I found out through the process of taking coconut oil in hot water with a squeeze of lemon three times a day for fivemonths is this: healing comes before weight loss.

In the process of taking all that coconut oil, I did lose about 5-10 pounds.  But instead of slimming down beyond that, I found that my weight stabilized and held as other health issues improved.  I had more energy.  I was sleeping regularly.  I actually wanted to work out and be active by going outside, walking, riding my bike, doing yoga and pilates.  I felt at ease, content, levelheaded.  I started to wonder if it was simply okay that I hadn't lost weight yet.  My body was healing!

Through that process I realized that when I give my body what it needs, it will heal from the roots up.  I am guessing that my weight gain and fatigue and hormone fluctuations are a result of nutritional deficiency.  As I heal from that deficiency, my problems disappear in order starting from the underlying issues all the way up to things like weight gain.  

So that brings me to the GAPS healing diet that I started on March 19th.  It was only natural that after healing with coconut oil alone, an intense healing diet was the next step.  I was sick and tired of being sick and tired.  I was having success healing, yes, but it was slow.  I was less tired, but I wasn't energetic all day.  I was more active, but I wasn't running and biking and yogaing everyday.  Those are the kinds of things I really want.  I want to feel excited and happy about life!  I want to run and bike and feel energized, not the need for a nap.

On March 19th I started the GAPS Intro Diet.  I made it through the six stages in about 6-7 weeks.  I am about to move to the Full GAPS Diet which includes more variety than any of the Intro Diet stages.  What I had experienced with the Eat Fat, Lose Fat diet was only a small part of the way I have been feeling for the last month and a half on GAPS.  Yes, the die-off was intense at first (the first week or two), but oh the energy! and oh the happy body I have!  GAPS is intense, yes, but it is worth it!

(I'll be writing more in depth on GAPS issues over the next several months.  I committed to do GAPS from March 19th until September 19th of this year.  I might even do a GAPS challenge for my readers in a week or two.  Don't worry, you'll only be committing to a week of GAPS!)