Showing posts with label holidays. Show all posts

Thursday, September 15, 2011

I Love...This Thing!

It was recently my birthday on September 11th, which brought along with it reflections on the national tragedy in conjuction with the Birthday Fairy.  The Birthday Fairy is my mother's invention (don't tell my kids!), and she makes birthday mornings ever so much fun!  You wake up on your birthday with a trail of goodies from your bed to the living room where, like a pot of gold at the end of the rainbow, you get some presents.  My kids love it, even when it's their mom's birthday.  M woke me up bursting and said "come see what you got, it's so exciting!!"

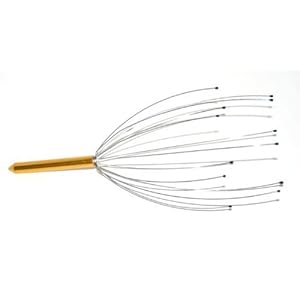
This year I chose several items from Amazon to "help" the Birthday Fairy choose things that I would truly love to have.  I found an old Super Nintendo game I used to love to play when I was a kid visiting my cousins house for under $10, as well as an almond flour cookbook to give support to my GAPS diet, and a CD that I haven't heard in years.  But the thing I am loving most is having this little doohickey around.  It's a scalp massager and I love it.  It relieves my stress and it was about $3, which relieves my stress a little more, ha!  The first time I used it on M he stopped in his tracks with half-closed eyes and said "it makes me feel all shiver-y".  Exactly.

Wednesday, December 22, 2010

Candy-Making and Cookie-Baking Extravaganza 2010

So I've been making quite a bit of progress on my Candy-Making and Cookie-Baking Extravaganza 2010!  I've also taken a lot of my favorite recipes and morphed them into my favorite versions.  Now they can truly be called k's.  So far I have made these items:
Peanut Butter Cups
Almond Joy cups
Coconut Citrus Fudge
Homemade Eggnog (in a blender)
Maple Shortbread and Classic Shortbread

And I've made these:
Cinnamon and Vanilla Nuts (I used pecans and cashews, gonna try walnuts and almonds later today or tomorrow)
Lemon Curd Bars (we have SO MANY lemons from Ryan's parents' house)

And of course we will be having some lovely breakfasts, like:
Baked Oatmeal with Dried Fruit, Yogurt and Maple Syrup
Crepes with Berries and Cream
Blueberry Buckle (recipe coming soon!)

And back to the treats again.  There are so many other recipes I want to try this week, like:
Almond Roca
Traditional Fudge
Caramel Corn
Bûche de Noël
Sugar Plums
Buckwheat Sourdoughnuts
Molasses & Cranberry Cinnamon Rolls
Sprouted Grain Doughnuts with Coconut Vanilla Glaze
Maple Sugar Candied Nuts

Tuesday, December 21, 2010

Coconut Citrus Fudge

Coconut Citrus Fudge
1 cup coconut butter
2-3 tablespoons raw honey
2 tablespoons coconut oil, gently melted
1 tablespoon orange, lemon, grapefruit or other citrus zest
1 teaspoon orange, lemon, grapefruit or other citrus extract (if using oil, use a few drops)

1. In a food processor pulse coconut butter and honey until combined.  Then with the processor running, add the coconut oil in a steady stream.  Add zest and extract or oil, and mix until combined.

2. On a cookie sheet lined with parchment paper or wax paper, spoon mixture and form into a rectangle.  Press with your hands to make the thickness even, about 1/4 inch thick.  Chill for 30 minutes in the refrigerator.
3. Remove from the fridge, and lift parchment or wax paper off the cookie sheet and transfer to a cutting board.  Cut into little squares or whatever bites you like.  

4. You can store these in the fridge, or even on the counter in an airtight container.  The coconut butter keeps it shape well, even at room temperature.  And this time of year our houses are on the cooler side.  Enjoy!

(Inspired by a review of Cooking to Heal by Kimi at The Nourishing Gourmet, I have made this "fudge" a few times.  It is very light, very nourishing, and kid-friendly.  My kids love it.  I have changed it a little, mostly to incorporate more coconut oil and achieve a smoother feel.)

Sunday, December 19, 2010

Joyous Almond Cups


Whenever I make these peanut butter cups I always end up making these Almond Joy-esque cups as well.  I use the same mini cupcake pan, the same spot in the freezer to freeze the two layers, and we end up with two flavors of cups to choose from for a sweet, but nourishing treat.  This recipe is my version after being inspired, as usual, by a recipe from Kimi over at The Nourishing Gourmet.

Even more so than the peanut butter cups, these joyous almond cups have a lot of coconut oil incorporated into the recipe.  Coconut oil has many benefits.  Coconut oil has a lot saturated fat.  But don't fear.  This saturated fat is good for you.  Yes you read that right.  The saturated fat in coconut oil is comprised of medium chain fatty acids, 50% of which are the fatty acid lauric acid.  Medium chain fatty acids are more easily digested, reducing strain on the liver, pancreas, and digestive system.  Coconut oil benefits a sluggish thyroid by this same logic: it takes less energy to digest coconut oil, freeing up your thyroid to heal and function better.  Coconut oil helps with energy levels and weight loss.  Coconut oil heals you from the inside out.

So when you wonder why I go through all the trouble of researching coconut oil, finding different kinds of coconut oil, and then incorporating it into my diet despite my lack of love for it's flavor, this is why.  I feel better when I have it in my daily diet.  I know the science behind it and am more than happy to have it's help healing my body.

Now let's get back to the treat part.  I make these either with or without chopped almonds.  Sort in the vein of sometimes feeling like a nut...But when I do add the nuts I make sure they are from my soaked and dehydrated stash.  Soaking nuts overnight in salt water helps neutralize the naturally-occuring enzyme inhibitors present in most nuts.  Then dehydrating them returns them back to their crispy state.  The almonds I used in this recipe were soaked, dehydrated, and then toasted for 20 minutes at 300 degrees just to bring out their flavor a little before I chopped them and added them in.

Joyous Almond Cups
coconut base:
1/2 cup gently melted coconut oil
1/4 cup gently melted raw honey
1 1/4 cups unsweetened, shredded coconut
1 1/2 teaspoons almond extract
1/2 cup chopped almonds, preferably soaked and dehydrated, then toasted for 20 min. at 300 degrees

chocolate topping:
1/2 cup cocoa powder
3 tablespoons raw honey
3/4 cup coconut oil
2 teaspoons vanilla
1 teaspoon coffee liqueur

1. Make coconut base: Combine melted coconut oil and raw honey.  Whisk well to combine.  Add shredded coconut and almond extract.  

2. Using a small ice cream scoop, divide among 24 mini cupcake molds.  Sprinkle each one with a little of the chopped almonds, dividing evenly.  Place in the freezer on a level surface for 30 minutes to harden.  

3. In the meantime, make chocolate topping: combine cocoa powder, honey, and coconut oil in a glass bowl set over simmering water.  Whisk until coconut oil is almost completely smooth.  Remove from heat and continue whisking, adding vanilla and coffee liqueur.

4. Remove frozen coconut bases, and spoon a little of the chocolate topping on each cup.  Place back in the freezer for another 30 minutes until frozen and set.  

5. To remove, pop out with a spoon or butter knife immediately after removing from the freezer.  Store in the freezer, or else they will melt.  To eat, I like to remove from the freezer and let sit for a few minutes to soften.  Enjoy with cold, whole raw milk, yum!
Saturday, December 18, 2010

Peanut Butter Cups


I love these peanut butter cups.  I made them last February for R for Valentine's Day.  I wrote the other day about looking for candy for Christmas at the store, but coming up empty.  Even in my compromising mindset I couldn't find anything that would work.  So I am making a few different candies and confections to help satisfy M's and E's sweet teeth on that magical morning.

But back to the peanut butter cups.  I have tweaked the recipe just a bit.  I watch Ina Garten on the Food Network quite a bit, and on her show Barefoot Contessa she occasionally shows how she tests recipes.  Ever since she explained how chocolate is enhanced by a little bit of coffee I have been paying attention to how she pairs them in different recipes.  She says that you do not end up tasting the coffee, but the chocolate tastes better.

Sometimes she uses leftover brewed coffee, sometimes it's instant coffee or espresso granules, and sometimes it's coffee liqueur.  I have Kahlua, so I have used that recently in any chocolate recipe I make.  I just eyeball between a teaspoon and a tablespoon.  I don't know enough about how they make instant coffee crystals to use them confidently, and I don't brew coffee at home.  (The caffeine affects my adrenals and such.)

Oh, and one last thing: after I use up the natural peanut butter in the jars in my fridge I want to make my own peanut butter.  It's very handy to have peanut butter around, so I think it's worth the trouble to soak peanuts in salt water, dehydrate them and then put them through the food processor.  The point of doing all of that is to avoid the enzyme inhibitors present in peanuts and nuts in general.  The soaking process neutralizes the enzyme inhibitors, helping you to not only digest them better but absorb more nutrients from the nuts.

Peanut Butter Cups
peanut butter base:
3/4 cup natural peanut butter, preferably from soaked and dehydrated peanuts
1/4 cup gently melted coconut oil*
2 tablespoons raw honey
1 teaspoon vanilla
1/3 cup chopped nuts, preferably soaked/dehydrated/roasted at a low temperature (300), optional**

chocolate topping:
4 oz. unsweetened chocolate, chopped
2 tablespoons raw honey
1 teaspoon vanilla
1 teaspoon coffee liqueur

1. Mix peanut butter and coconut oil together until smooth, using a rubber spatula.  Add honey and vanilla and stir until smooth.  Using a small ice cream scoop, divide among the 24 mini cupcake molds in a mini cupcake pan.  Put into the freezer for 20 minutes or so while you make the chocolate topping.

2. In a glass bowl set over a pot of simmering water, stir chocolate, honey, vanilla and coffee liqueur with a wooden spoon until almost smooth.  Remove from the pot and set onto a hot pot holder while you continue to stir until completely smooth.

3. Remove mini cupcake pan from freezer and spoon chocolate mixture onto each peanut butter cup, smoothing a little with the back of a spoon.  Place back into the freezer until solid, about 20 minutes or more.

4. Remove with a spoon or butter knife.  They should pop out with a little elbow grease, as long as they are completely solid.  If they mush together at all, put them back into the freezer for a few minutes and try again.  Store in the freezer until you want to eat them.

5. To eat, I like to take a few out and let them rest on a plate for a few minutes to soften.  And, of course, my favorite way to eat them is with a cold glass of whole, raw milk.  Enjoy.

*You can use virgin coconut oil (which will taste like coconut), or expeller-pressed coconut oil (which will have neutral taste).  I prefer the expeller-pressed, but I have tried it both ways and the coconut flavor does work in this recipe.

**(I didn't add these, E can't chew them very well; he choked on a swiped cashew yesterday when I wasn't looking, scary!)

Wednesday, November 24, 2010

Real Jumbleberry Pie

I made my sprouted flour pie crusts last week, the recipe is here.  I pulled some out of the freezer this morning, rolled them out and made my favorite pie: jumbleberry.  Enjoy!

Jumbleberry Pie Filling

Mix together:
5 cups of berries--I eyeballed equal amounts of strawberries, blueberries, blackberries and raspberries
3/4 cup rapadura (or Sucanat, maple sugar, palm sugar)
1/3 cup sprouted wheat flour
2 tsp. lemon zest (optional) (I forgot this)


1. Preheat oven to 375 degrees. When ready to roll out, pull ONE flattened ball out of fridge and roll on a lightly floured surface with a rolling pin. Have your pie dish ready so you can properly estimate how large to roll your dough. When dough round is the right size, use your rolling pin to move it by rolling your dough around the rolling pin like a scroll and gently transferring it to unroll over the dish. Ease it into the dish and press down flush.
2. Pour filling into pie. Set aside.
3. Take out remaining ball of pie dough from fridge. Roll out on a floured surface, not as big as the last round since it only needs to be on top of the pie. Transfer over to filled pie. Press edges together with fingers. Cut excess off of edges of pie with a sharp knife. Press edges again with a fork, dipped in a little flour if sticking to pie dough edge. Poke decorative holes into top of pie with sharp knife. Brush entire top of pie with whole milk. Sprinkle with coarse sugar (I used a little turbinado sugar I am trying to get rid of; you could use rapadura, but it would look darker). Cover edges with foil to prevent over-browning.
4. Bake for 25-50 minutes, longer for frozen berries. Then remove foil and let bake completely uncovered for another 20-30 minutes or so until the pie looks perfectly brown. Cool on a wire rack.
(Serve with real whipped cream sweetened with rapadura, or homemade vanilla ice cream made with raw milk and raw cream. Yum!!!)

Friday, November 19, 2010

Pie Crust

It's that time of year to make pie!  Complete with rapadura instead of sugar and sprouted wheat flour instead of white flour, this pie crust is a hit among the my family, even those not avoiding sugar or white flour. 

I say this is a nourishing pie because if you buy grass-fed butter (like Kerrygold) it is full of vitamin K2. You can google vitamin K2 and get a lot of information about it, but I like these two links here (basic K2 info) and here (list of vitamin K2-rich foods).

The rapadura is full of nutrients because it is the only form of sugar processed without ever being separated from the molasses. It is considered a whole food.

Sprouted flour is neutralized of it's phytic acid, so you can absorb all the good trace elements in the grain like calcium, magnesium, etc. You can buy sprouted flour or make your own.

Double Pie Crust

3 cups sprouted wheat flour
3 and 1/4 sticks (26 Tablespoons) of grass-fed butter, cut into small pieces, very cold, preferably straight from the fridge
1 teaspoon sea salt
2 Tablespoons rapadura (or Sucanat, maple sugar, palm sugar)
3/4 cup ice water

1. Make pie dough: Mix flour, salt and sugar with a whisk in a bowl to sift.
2. Take butter out of the fridge and sprinkle small pieces over flour mixture. Using a combination of a pastry cutter and your hands (or just your hands), cut in the butter until the crumbs are between the size of peas and olives. You can also use a stand mixer with the whisk attachment, or a food processor.  Add ice water a little at a time, blending with your hands, until the dough comes together.
3. Lay out two pieces of plastic wrap and put half of your pie dough on each. Using your hands and the plastic wrap, form each pile into a ball, then flatten into a disk and wrap up tightly. Chill in the fridge for 30 minutes. Or, store in the freezer up to a month.  To use, transfer to the refrigerator a few hours before you want to roll it out and use it.

Saturday, March 17, 2007

Happy (nerdy) St. Paddy's!

so first of all, i AM a nerd. although nerd might not be the best way to put it. it's more like a combination of being a nerd, being a little embarrassed, and being a little bit proud. so here it is: i love holidays. i love all that Martha Stewart, house- and food-decorating, making crafty little thingys, looking forward to excuses to bake cookies and take them to the neighbors, stuff. and so i refer to it as nerdiness. but on the other hand, i'm a little embarrassed to like that sort of thing when i clearly DON'T like other assumptions about housewifery. (example: i have no love for housecleaning. and sometimes i get bored staying home with M. i admit these things freely.) thus bringing us to the pride. i'm proud that the reason i'm doing all these nerdy things is because i really want to, because i'm a holiday nerd. so brace yourselves if you're reading this and live nearby. you may get some green heart-shaped sugar cookies in the design of a shamrock on a plate brought to your door. and if i had brought them over today, i would've been in my green pants and a green shirt. fairly warned be ye, says I.

i suppose i could rationalize this one, since i am 1/4 Irish. but it's not like i'm doing any truly Irish things for the sake of my heritage. i'm mostly being as Americanized as possible, only knowing about shamrocks and wearing green. and that most everyone else drinks a lot and is wasted by noon (especially in Ann Arbor). we are making corned beef and cabbage today though. so that's something. Happy Saint Patrick's Day to all!!